Gud4Nothin

My techno babbling space

right.

Home page
An outdated (b)log

Google

Friday, May 02, 2008

Blog shifted

This blog has been shifted to http://www.sahil.cc

Wednesday, June 06, 2007

Stereoscopy

Today is a great day!!

For the first time I was able to cross view. And only today I found out the type of stereograms I used to play with were parallel viewing. To find the difference between them go here or here. (Gosh! wikipedia articles for cross view and parallel view don't exist. I could create one someday!)

Here is a great tutorial to get you started with crossviewing.

Normal viewing :

Parallel viewing : Brain thinks image is farther.
In case of two adjacent images,
L R
| |
L R -> eyes, right eye sees right image, left eye sees left, and we overlap these two.


Crossviewing : Brain thinks image is nearer.
In case of two adjacent images,
L R
\/
/\
L R -> eyes, right eye sees left image, left eye sees right, and we overlap these two.

Labels: , , , ,

Sunday, June 03, 2007

Normal forms

Sitting here in Morgan Stanley, it's hard to find free time. Things are always on the run.

But one day, I did find free time, and did what I had wanted to do for a very long time - learn about Normal forms in RDBMS.

Here is what I gathered from these websites :
1st Normal Form:
  1. No multivalued attribute
    StudID|Course
    12345|3100,3600,3900
    54321|1300,2300,3400
    (Wrong)
  2. No repeating group
    StudID|Course1|Course2|Course3
    12345 | 3100 | 3600 | 3900
    54321 | 1300 | 2300 | 3400
    (Wrong)
  3. Presence of atleast one unique identifier (addn of ID field)
    StudID|Course
    12345 | 3100
    12345 | 3600
    54321 | 1300
    54321 | 2300
    (Right)
There needs to be one composite key atleast. (One or more fields that can be used to distinguish every row uniquely). In the above example, if it was possible for the same student to take the same course twice, then we would have to add another uID field to bring the DB to the first normal form.

2nd Normal Form:

The DB is in this if all non-prime attributes are completely dependent on a candidate key. (and not on a part of it).
i.e. no repetition of key detail in one detail

| Candidate Key |
|StudID CourseID | StudNm ProfID ProfName
|123456 310000 | April00 6789 David
|123456 410000 | April00 2345 David
|123456 210000 | April00 6789 David

Candidate Key = StidID + CourseID

But StudNm (student name) depends only on StudID (and not on StudID + CourseID)
Had prof been just a function of course, even that would have to be removed.
Hence it is not in 2nd NF.
The ProfName-ProfID dependency is removed in the 3rd NF (where no attribute can be dependent on a non-key attribute in that table).
No part key dependencies can exist in 2nd NF.

None of the non-prime attributes of the table are functionally dependent on a part (proper subset) of a candidate key; in other words, all functional dependencies of non-prime attributes on candidate keys are full functional dependencies. For example, in an "Employees' Skills" table whose attributes are Employee ID, Employee Address, and Skill, the combination of Employee ID and Skill uniquely identifies records within the table. Given that Employee Address depends on only one of those attributes – namely, Employee ID – the table is not in 2NF.

  • Candidate key: A candidate key is a minimal superkey, that is, a superkey for which we can say that no proper subset of it is also a superkey. {Employee Id, Skill} would be a candidate key for the "Employees' Skills" table.
  • uperkey: A superkey is an attribute or set of attributes that uniquely identifies rows within a table; in other words, two distinct rows are always guaranteed to have distinct superkeys. {Employee ID, Employee Address, Skill} would be a superkey for the "Employees' Skills" table; {Employee ID, Skill} would also be a superkey.
  • Non-prime attribute: A non-prime attribute is an attribute that does not occur in any candidate key. Employee Address would be a non-prime attribute in the "Employees' Skills" table.
  • Primary key: Most DBMSs require a table to be defined as having a single unique key, rather than a number of possible unique keys. A primary key is a candidate key which the database designer has designated for this purpose.
Some thoughts :
  • In and after 2nd NF, all tables have only one candidate key. -> FALSE
  • All candidate keys in a table map to each other one to one. -> TRUE
  • What normalization stage ensures that only one candidate key is remaining?
    • None. Beacause normalization aims at reducing data duplication and inconsistencies. Candidate keys in a table causes no redundency.
  • If a table in 1st NF has no composite candidate keys (candidate keys consisting of more then one attributes), then it is automatically in 2nd NF.
3rd Normal Form:

No non-transitive dependencies:
A non-transitive dependency is one in which an attribute is dependent on a non-key attribute in that table.
For example, in the ProfID example given above, to bring it to 3rd normal form, ProfName and ProfID would have to brought to a separate table. Because ProfName is a non-transitive dependency.
  • In 2nd Normal form, all candidate keys become mutually independent. FALSE
  • In 2nd Normal form, any candidate key is a candidate key (i.e. is a sufficient and necessary dependency) for all other attributes. FALSE - this happens in 3rd NF.
  • In 3rd Normal form, non-prime attributes become dependent on a candidate key. TRUE

Labels: ,

Thursday, December 14, 2006

A few notes on exposure

Exposure refers to the amount of light falling onto the camera sensor. It is governed by two things :
  1. The sensitivity of the medium the light is falling on (the ISO setting of your camers).
  2. The length of time for which the shutter the open and the apperture size (the brightness setting of your camera.
So, if you want a bright image, either increase the ISO sensitivity or increase the brightness. Increasing ISO sensitivity reduces image quality by increasing noise. Increasing brightness reduces the image quality by reducing the shutter speed.

For a great special effect reduce the ISO sensitivity and increase the brightness to get the same effect you would get by moving the "levels" center controller in any image editting software to the left. This is because of the increased exposure time.


For a natural looking image reduce the brightness and increase the ISO sensitivity.

Labels: , ,

A digital photographer's heaven

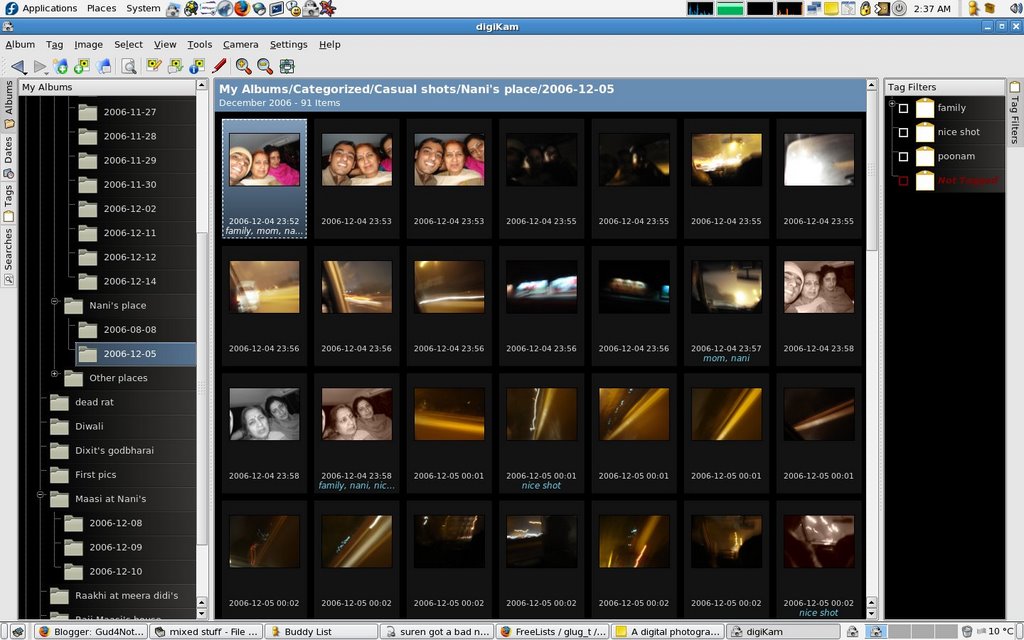
The more I use digiKam, the more I appreciate it. I can't imagine managing my photos without it! (sorry windoze user :P )

The one feature the really struck me was the advanced search features. In digiKam you can create complicated search queries and can store the resulting photos as a group! Neat...
In the many chronologically arranged albums I had, I tagged the pics I liked with the tag "Cool shots". Then to get all the cool pics at once, all I had to do run a search for all pics tagged "Cool shots" and it would show up all the nice pics all at once. The combinations are endless. For example, you might want to look at only the "nice" pics from the shots of your cousin you took.
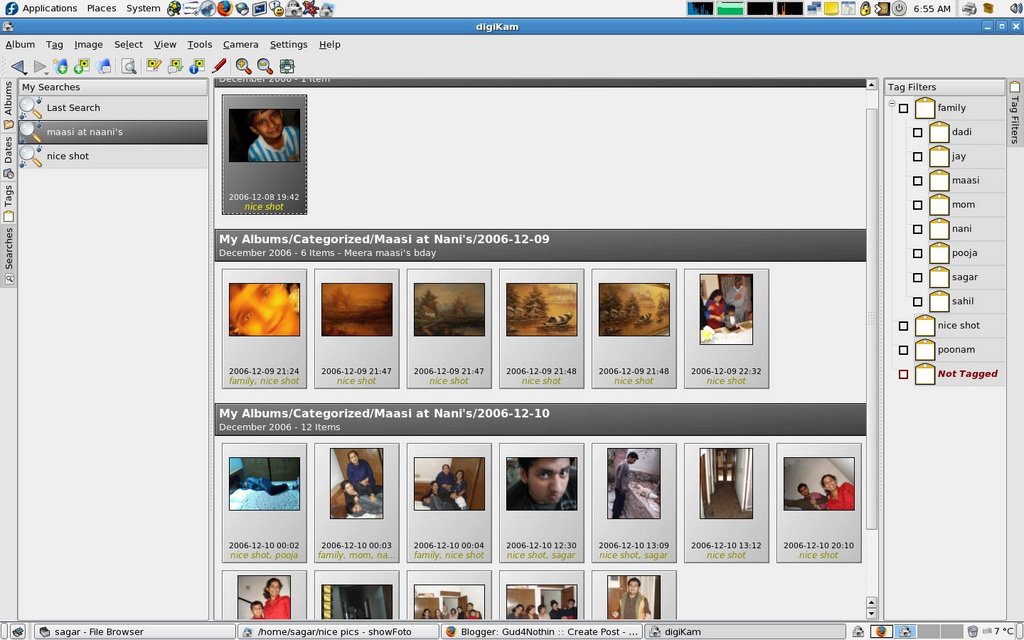
One more great thing about digiKam is all its cool plugins. One really utilitarian plugin is the red eye removal plugin. It does work.

Labels: , , , ,

Friday, November 24, 2006

Using digiKam for managing photos.

Today I discovered one of the coolest softwares to manage photos from a digicam! The software's name is digiKam.

The thing I liked the most about the software is the date view and the album view.

I own a Sony W70. It has 2 modes of connecting to the computer (both use the USB connecting cable provided with the camera). One is the "USB Mass Storage mode" and the other is the "PTP/IP Camera" mode. I asked my camera to show itself using the PTP.. mode (through the camera menu interface) and selected the import option in digiKam. Importing photos in digiKam really is easy.

After the photos get imported, in the date view all the photos show up in a cool chronological order. In the album view you can arrange the pics according to your preference. You can have albums, sub-albums, sub-sub-albums... in a folder tree fashion.

digiKam lets you resize, crop, rotate your images and apply simple color filters, adjust levels etc. It also has a cool feature of displaying the "EXIF" data of an image. That is basically information like focal length, digital zoom, exposure, ISO level and other details about the snap itself.

Sunday, July 09, 2006

File Sharing on LAN

I was thinking of various ways of sharing stuff (movies, mp3's... you know.. the illegal kind) on our lan...
And here is what I came up with :
  1. Use ftp - Create ftp servers, have a central site having the list of these servers.
  2. Use nothing - a revolutionary way of simply sharing through windows "share file" feature and setting up samba servers in linux.
  3. Use p2p file-sharing - by using one of the protocols listed here.
Out of these...... I like the p2p file sharing method. Coz :
  • It's the right way to do it in a network like our's.
  • Yup. That's it.
Now.... read on only if you are interested (otherwise skip) or you will sleep.

Out of the listed protocols (from the site I linked to earlier) Gnutella, EDonkey and Direct Connect are the popular ones.
The most popular file sharing clients licensed under GPL for Gnutella is LimeWire, for EDonkey it's aMule, and for Direct Connect it's DC++.

DC++ has the "minimum amount of space needed to be shared in order to connect" feature... so we will use DC++. >=)

It's so easy!!! (Resetting the root password I mean)...

Look at this from Fedora FAQ -
Q:How do I reset my root password?
A: If you've forgotten your root password, and you want to change it, don't worry! It's possible. You need to boot into what's called "single-user mode." You must be in front of the computer to do this -- you can not do it remotely:
  1. Using the instructions in the runlevel question (under the "While You Are Booting the Computer" section), boot into runlevel 1.
  2. Set the new root password with by typing:

    passwd

    And then enter your new root password when asked.

  3. Reboot your machine, and you will now be able to log in as root with the new password that you entered.
And here's that runlevel question -
  • While You Are Booting the Computer:
    1. When you first start your computer, the GRUB screen (where you choose your Operating System) appears. Select the Fedora that you want to boot into, but press the a key instead of pressing Enter.
    2. You will see a line somewhat like the following:

      kernel /vmlinuz-2.6.9-1.667 ro root=LABEL=/ acpi=on rhgb quiet

      Add the number of your runlevel to the end of that line, and then press Enter. For example, to boot into text-only mode, the line would look like:

      kernel /vmlinuz-2.6.9-1.667 ro root=LABEL=/ acpi=on rhgb quiet 3

    You will then boot into the new runlevel this time only.

  • This just shows how easy it is hack into our systems unless we secure our grub!

    Programs like these make life easy - Fedora Frog

    Man!!
    This really is great! Here is what the site says -
    Fedora Frog is GUI install script that jumps your Fedora Core 5 to life in no time... Fedora Frog supports 32 bit installations, some parts may work also on 64 bit installations.
    This script installs most of the stuff you will ever need to get things really working in Fedora Core 5. Here's what it can do (Hold your breath!) -
    • Install extra repositories [RPMForge]
    • Install GUI frontend for yum [yumex]
    • Install commonly needed multimedia codecs
    • Install DVD playback capability
    • Install Java JRE and its plugin for Firefox
    • Install Macromedia Flash plugin for Firefox
    • Install extra fonts (including msttcorefonts)
    • Install graphics drivers for nVidia and ATI cards
    • Install Gnome Configuration Editor
    • Install numlockx to turn on NumLock on startup
    • Set up Gnome to open System Monitor every time you push Alt-Ctrl-Del
    • Disable CD blocking in CD-ROM
    • Set up Nautilus to open new folders in the same window
    • Install rar archiver
    • Install Adobe PDF reader
    • Install Gwenview and digiKam imageviewers
    • Install XMMS (analog of Winamp)
    • Install amaroK media player
    • Install stream directory browser Streamtuner
    • Install CD ripper Grip
    • Install Xine, VLC, Mplayer multimedia players
    • Install RealPlayer 10
    • Install Skype
    • Install Thunderbird e-mail client
    • Install Liferea RSS reader
    • Install Opera web browser
    • Install CD/DVD burning utility K3b
    • Install FTP utility gFTP
    • Install File share utility DC++
    • Install P2P BitTorrent client Azureus
    • Install P2P eMule Client aMule
    • Install P2P Gnutella Client LimeWire
    • Install KDE Edutainment programms
    • Install Photo-realistic nightsky renderer Stellarium
    • Install Some additional games
    • Install Alacarte Gnome menu editor
    • Install Shortcut to browse files as root
    • Install Some desktop backgrounds, icons, themes and screensavers
    • Install fortune and make Gnome Fish-applet to use it

    Saturday, July 08, 2006

    Installing xgnokii for n-gage (in Fedora Core 5)

    There's no nice guide for this!! So, I made one for myself.
    I own a Nokia N-Gage RH-29 (The one for Asia ... or something like that). Now, I refuse to use windows for seeing all my contacts on the computer. But for using the tool for linux (xgnokii) for Nokia phone doesn't work right away for Nokia N-Gage.

    Here is how to make it work -
    1. Install gnokii and xgnokii - "yum install gnokii xgnokii".
    2. Follow instructions in the xgnooki wiki with the modifications in steps 3 and 4.
    3. For installing the gnapplet.sis in N-Gage (and Nokia 6600), you have to get the one in here. And in gnapplet.ini file, you have to set irda_support = 0. For that copy the file to computer (through memory card reader or any other way), edit it (change 1 to 0 against irda_support), and copy it back to phone's memory.
    4. Now here's the tricky part - if you use the bluetooth dongle like me for bluetooth connection (or even otherwise), how do you find the bluetooth address for that device ? Here's how - 1) Plug the device in. 2) login console as root (su) and type "hcitool inq". The bluetooth address must be displayed in console.
    5. Start xgnokii as root ("su";"xgnooki &").... and then the app starts.

    Mobile(s) with Fedora Core 5

    Easy Teq.: Connecting your Nokia 2112 with your Fedora Core 5 - a guide for connecting (a) Nokia phone with Fedora Core 5.

    But what is wanted to know is how to connect my N-Gage with FC5 >=l